2015年9月13日星期日

柚子酢鹽麴涼拌牛蒡

相信大家都知到牛蒡是非常有益的食材,一般廣東家庭常用於煮老火湯或泡牛蒡茶。為了更常用牛蒡烹調各種美食,我翻閱了多本有關養生食材的參考書和上網搜尋資料,發現:

  1. 牛蒡最有益的成分在纖維之中,靠煮湯或泡茶不能充份釋出營養;
  2. 長時間烹調會破壞牛蒡的部份營養;
  3. 要最大程度保留牛蒡的營養,必須保留表皮,只可用軟刷洗走泥土。
這個已是我寫的第三個牛蒡食譜,希望你都會試一試這道美味、清爽又健康的菜式!


材料:(比例按自己喜好決定)
  • 日本牛蒡,洗淨,斜切薄片,再切成細絲
  • 甘筍,切細絲
  • 木耳絲,浸發透
  • 薑,刮皮,切細絲
  • 薑,一小片,木耳絲汆水用

涼拌醬汁:(比例按自己喜好決定)
  • 麻油
  • 柚子酢
  • 純米醋
  • 味醂
  • 鹽麴
  • 烤烘芝麻


做法:

  1. 燒熱水,加入一少片薑和木耳絲,煮 3 分鐘,隔水瀝乾。
  2. 重新燒沸一窩水,加入牛蒡絲汆水 2 分鐘,再加入甘筍絲和薑絲燙一分鐘,隔水瀝乾。
  3. 把材料拌勻,加入醬汁拌勻,至合口味,撒上烤芝麻即可上碟。

儲存:
  • 我常會多預備一點,只要瀝乾水,未拌入醬料,可在冰箱存放兩三天,上碟前才拌入醬料。最近在家品店買了有隔篩的食物盒,非常合用。


溫馨提示:

  • 切牛蒡不能馬虎,因為纖維粗糙,要慢慢細切至不粗於火柴枝,否則口感較差。我亦試過用不同設計的刨絲器,但始終難及手切細絲可口。
  • 千萬不要把燙牛蒡和甘筍的水倒掉!!! 是美味有益的「甘筍牛蒡茶」喔!


變奏:

  • 以上只是涼拌牛蒡的基本!你可以隨自己的口味和心意...又或視乎冰箱內的食材而加入其他材料,增加風味!

「柚子酢鹽麴涼拌牛蒡」加入切細絲的荷豆

「柚子酢鹽麴涼拌牛蒡」加入青瓜細絲
其他牛蒡食譜可參考:甘筍木耳炒牛蒡 及 蕃茄牛蒡濃湯


2015年9月6日星期日

自家欖豉醬 - 冰箱常備百搭醬料

每年都會做一、兩回自家欖豉醬,更會送給好友們「看門口」,因為這款醬料相當百搭,下班後趕着烹調晚餐,加一兩大匙入材料中,即能為餸菜提升層次。隨便介紹一些自己煮過的配搭:蒸帶子豆腐、蒸或炒貝類海鮮、蒸鹹淡水魚、南瓜蒸排骨、豬頸肉炒涼瓜、秋葵炒鴕鳥肉、拌麵等,味道都非常搭配。今天買了海青斑鰭,打算用欖豉醬蒸,剛又用完存貨,重新做一些,做了記錄與大家分享。

自家欖豉醬蒸海青班鰭


材料
  • 欖角,110克(約 3 兩,南貨店有售)
  • 豆豉,90-110克 (我很怕每樣食材留少少,所以份量較彈性,視乎當時買那個品牌的豆豉)
  • 蒜茸,2 大匙
  • 陳皮,一個,浸發好
  • 紅尖椒,一隻(喜歡辣可換成指天椒,份量隨自己口味加減)
  • 油,3 湯匙
  • 原糖,1 至 2 大匙
由左上方順時針:食油、欖角、蒜茸、黑糖、陳皮、紅尖椒、豆豉


做法
  1. 用清水分別洗淨欖角和豆豉,稍稍浸泡,減低鹽含量,瀝水,再以廚紙充分印乾,分別刴至細碎備用。
  2. 陳皮及辣椒分別切成細絲備用。
  3. 我習慣用易潔鑊煮醬料,不易煮糊。以中火燒熱鑊,加油,見到油紋,加入紅尖椒(肉比指天椒厚很多,含水太多保存時間較短,所以最先落鑊),爆炒一會。
  4. 轉中細火,再加入蒜茸和陳皮爆香。如選用指天椒,可於這步驟同時加入。
  5. 加入欖角和豆豉,拌勻,繼續爆炒至酥香,如覺得醬料乾,可以酌量加點點油。
  6. 最後加入原糖,拌炒均勻。熄火,待涼入瓶,可在冰箱肉儲存幾個月。


2015年8月26日星期三

Angus Beef Rib-fingers in Milanese Style

This dish was inspired by an authentic Italian recipe Osso Buco in Milanese Style in an old Italian cookbook. Inspired by the recipe, I adapted it according to my preference:
  1. Always cook meat with plenty of veggies.
  2. Use whatever fresh herbs I have in my patio, because fresh herbs can elevate the fragrance of the dish to it's most.
  3. We seldom drink, I always replace white wine with sake, which can be kept at room temperature instead of occupying the precious fridge capacity. 


Braised Angus Beef Rib-fingers in Milanese Style served with cooked brown rice

I used a similar method to cook osso buco and beef rib-fingers, the main difference is:
  • For the osso buco, veggies were chopped, softened and caramelized before adding the meat. The sauce came out concentrated with sweet intense flavor.
  • For the Angus beef rib-fingers, veggies were cut into chunks, just browned a bit and the meat was added. End up I had a pot of watery sauce and had to reduce it on the stove.
Braised Osso Buco in Milanese Style cooked brown rice

Ingredients

  • Angus beef rib-fingers, approximately 500g, cut into 2.5"-3" pieces
  • Brown onion, 1 medium, finely chopped
  • Carrots, 2 medium, finely chopped
  • Celery, 3 stalks, finely chopped
  • Garlic, minced, 1 teaspoon
  • Lemon peel, 1 strip
  • Sake, 1/2 cup
  • Vegetable broth, 1/2 cup
  • Peeled and chopped Italian Tomatoes, 1 can (400 g)
  • Fresh Thyme, few sprigs
  • Fresh Italian parsley, few sprigs
  • Fresh Rosemary, 1 sprig
  • Dried Bay Leaves, 3
  • Freshly ground black pepper and salt, to taste
Method
  1. Preheat the oven to 160C (Convection only).
  2. Choose a cast-iron cocotte or a heavy-bottom pot which can just accommodate the meat in a single layer. Heat the pan in medium heat, grease the pan lightly, add the onion, carrots and celery, cook until softened and caramelised, add the lemon peel and cook for another 2-3 minutes. Remove from heat.
  3. Heat a frying-pan, grease it. Coat the meat with some flour, shake off the excess. Put the meat into the frying-pan and brown them all over. Remove the meat and set them on top of the vegetables.
  4. Add sake to the frying-pan, reduce it by simmering over medium heat while scraping off the caramelised residue in the pan. Add the broth and bring it to a simmer. Add the liquid to the cocotte. 
  5. Add the tomatoes with their juice, the herbs, salt and pepper. The liquid should just cover the meat. If it doesn't, add more. Bring the liquid in the pot to a simmer.
  6. Put the cocotte into the preheated oven and cook for 2 hours.

柚子酢涼拌蓮藕片

要保持身體健康,食物多元化非常重要,不但種類要多,顏色亦要多。平日預備中式 “兩餸一湯” 二人晚餐,最簡單是一碟深綠色的蔬菜,加一道蒸魚,難以達至多元化,但多煮一道菜又太嫌多。後來想到:只要預備點涼拌菜,一來可增加食物多樣性,二來開胃,操作亦簡單,又可以提早一天預備食材,放入雪櫃儲存,留待上菜前材拌入醬汁。這樣的安排更適用於家中款客,不費吹灰之力又加一兩道前菜,簡單又健康。


我倆都喜歡吃蓮藕,無論煮湯、燜、炒、煎、蒸、做甜點等都喜歡,但夏日炎炎,做涼拌也是個好主意。

我們常常在巿場買到的蓮藕,主要分兩種:未經加工,仍裹着泥巴的 “泥藕” 和已經加工處理,個子亮白的蓮藕。我當新手主婦時,都是買經過加工處理的蓮藕,後來與菜販熟落,有一次我選蓮藕時,老闆娘在我耳邊低聲說:「你還是買泥藕吧!加工的蓮藕可能浸過化學劑,我都不敢吃! 」自此每次都買泥藕。此外,雖說蓮藕生吃可清熱,但由於它長於泥濘中,易有寄生蟲,並不建議生吃,必須用氽水才用,吃得安心。

應該選擇泥藕


材料
  • 蓮藕一段,洗淨去皮,切薄片
  • 甘筍一條,切片
  • 木耳適量,浸發透,去梗


醬汁 (我調涼拌醬汁相當隨意,未有記下分量,請按自己喜好調配)
  • 芝麻油
  • 柚子酢
  • 醬油
  • 米醋
  • 鹽麴


做法

1. 用中鍋把水燒開,放入藕片燙 1 分鐘,加入甘筍片再燙一分鐘。

2. 用篩隔起藕片和甘筍,放入用冷開水做的冰塊和冷開水中降溫,保持蔬菜爽脆。

3. 把木耳放入沸水中燙 2 至 3 分鐘,以篩隔水,加入冰水中冷郤。


4. 把所有材料放入 veggie spinner 轉乾。


5. 加入調好醬汁拌均,可立即上碟,亦可放入雪櫃 30 分鐘讓味道融合,但加入醬汁的蔬菜不宜久放,會大量滲水,影響食味。上菜前撒上芫荽碎和芝蔴。

2015年7月31日星期五

Wholewheat Bread with Cooked 18-Grain Brown Rice 十八穀糙米飯粗麥麵包

Tried to bake "Bread with Brown Rice" recipe in the User's Manual and my Zojirushi bread machine, I must admit that the machine is great to bake simple soft bread loaves, but when it comes to recipes with a proportion of wholewheat flour and added grains, I'll prefer to use my Kenwood stand-mixer and the oven.

Inspired by the recipe mentioned above, I made a lot of adjustments and it finally became my "Wholewheat Bread with Cooked 18-Grain Brown Rice"


Ingredients:
  • Ice-cold drinking water, 130ml
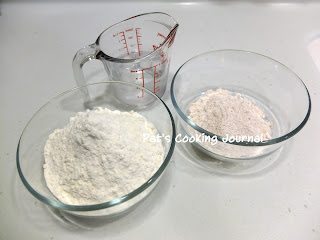
  • Bread flour, 200g (Plus extra 1-2 teaspoons if the dough is too tacky)
  • Wholewheat bread flour, 50g
  • Cooked 18-grain brown rice, chilled, 150g (Can be replaced with other cooked brown rice)
  • Muscovado (Brown sugar), 6g
  • Sea salt, 3g
  • Instant dried-yeast, 3g
  • Butter, 10g (can be replaced by olive oil or other vegetable oil)
材料

  • 冰水,130克
  • 高筋粉,200克 (如搓起麵糰太濕,可能要額外1-2茶匙)
  • 全麥高筋粉,50克
  • 18穀糙米飯,150克 (可以糙米飯代之) 必須放涼
  • 黑糖,6克
  • 海鹽,3克
  • 即溶乾酵母,3克
  • 牛油,10克 (可以橄欖油代之)


Kneading equipment: I used the stand-mixer with dough-hook. You can also use hand-mixer with dough-hooks or knead by hand. 

搓麵工具:我用廚師機配拌麵勾。可選用電動攪拌器配拌麵勾又或用手搓。


Method 方法

1. Autolysis: Combine the cold water and flours in the mixer with slow speed until it just form a dough.

水合法:在攪拌缸中加入兩種麵粉和冰水,以慢速拌至剛成糰。


2. Autolysis: Allow the dough to sit in the mixing bowl covered to rest for 30 minutes. The flours will be fully moistened and the gluten will develop.

水合法:把麵糰留在拌缸中 30 分鐘,讓麵粉充分給收水分及成筋。


3. Add all ingredients except butter, beware not pour the yeast on to the sea salt. Turn the mixer on medium low and allow the ingredients to combine well and form a relatively smooth dough. 

除了牛油,加入其他材料,注意勿把酵母直接倒在海鹽上。以中低速把所有材拌勻,成一稍光滑麵糰。


4. Add the butter, mix on low to medium speed until well combined to form a relative smooth dough.
加入牛油,以中慢速拌勻至麵糰光滑。


5. Transfer the dough to a greased food bag, twine the bag and tie a single knot at the opening to allow room for the dough to grow and keep the dough moist.*

倒幾滴油入食物袋內,搓勻防止麵糰黏連。把麵糰移至食物袋,卷好袋口,在袋口位置打一單結,讓麵糰有足夠空間發酵,同時可保持濕度。*


*You can put the dough into the fridge overnight to allow the yeasts to work at low temperature, which replaces 1st Fermentation in Step 6.
*至此步驟,可把麵糰放入雪櫃進行低溫發酵過夜,取代第6步驟「基本發酵」。


6. 1st Fermentation: Set the oven to 30℃ fermentation setting and allow to rise until the size doubled. For your reference, mine takes 50-60 minutes. 

基本發酵:把麵糰放入水波爐以攝氏30度發酵至兩倍大。我做的麵糰常要 50-60 分鐘才完成基本發酵。


7. Knock down, roll round and rest: Take the dough out on a silicone pad, knock down with a rolling pin or your hands to expel the air. Roll round the dough. Cut two sides of the food bag open, cover the dough with greased side down and allow to rest for 10-15 minutes. 

排氣、滾圓、鬆弛:把麵糰移至矽膠墊上,用滾麵杆或用手壓下去把空氣擠出來。重新把麵糰滾圓,把食物袋兩邊剪開,已抹油一邊向下,蓋在麵糰上,室溫放置 10-15 分鐘鬆弛。


8. With a rolling pin, roll the dough into an oval shape, approximately 20 x 30 cm.

以滾麵杆把麵糰壓至橢圓形,約 20 x 30厘米。


9. Tuck in and roll the dough to form a loaf.
把麵糰從一邊卷入。

10. Nip to seal the edge of the dough.

捏緊麵糰收口。

11. Transfer the dough to a parchment paper with the sealed edge faced down.

把麵糰移至已墊焗爐紙的底盤上,收口向下。


12. Second fermentation: Put the shaped dough into the oven at fermentation setting 40℃ steam until the dough doubled. My dough takes 40 minutes.

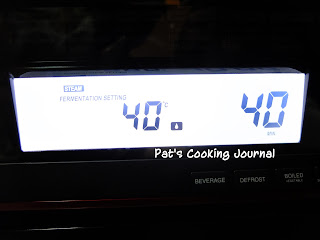
第二次發酵:把完成做型的麵糰放入水波爐,以攝氏40度加水蒸汽發酵模式,讓待麵糰發至雙倍大。我的麵糰需時約 40 分鐘。


13. Remove the dough from the oven. Set the oven to Automode 14 - French Bread and preheat with baking tray on the upper rack.

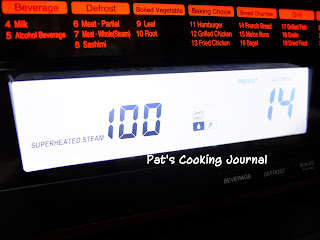
取出麵糰。把水皮爐調至自動模式 14 法包模式,放一個焗盤至上層一同預熱。


14. Sprinkle the dough with bread flour and make a few slashes with a blade.

在麵糰上輕輕撒上高筋粉,用刀鋒割幾刀。


15. When the oven reached the desired temperature, transfer the dough with the parchment paper onto the preheated tray and turn the oven on.

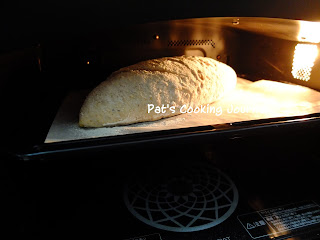
當焗爐完成預熱,把麵糰連焗爐紙移至已預熱的焗盤上。開始烤烘。


16. Decrease the baking time to 27 minutes. Have to check whether the dough is after two thirds of the baking time, may have to turn the tray inside-out for even browning. 

把烤烘時間調至27分鐘。剩餘三份一時間需檢視烤烘情度,可能要把焗盤內外對掉,以令烤色更均勻。


17. Remove the bread once baked and leave to cool on a rack.

完成後立即取出麵包,在架上放涼。


Variations:
Feel free to replace the cooked 18-grain brown rice with any brown rice you are accessible to. I have also tried with cooked 10-Grain Cereal by Bob's Red Mill, which is also awesome.


2015年7月24日星期五

鮮荷葉蟲草花雲耳蒸嘉美雞

一向喜歡鮮荷葉的清香,但每年供應時間都很短。適逢小暑,看見有翠綠的鮮荷葉應巿,買一整片。為了發揮這只值幾塊錢的荷葉的消暑、清香的優點,我買了半隻嘉美雞,浸發了一把蟲草花和櫻桃木耳,煮了這道菜。修剪過荷葉,剩下的邊沿還足夠煮冬瓜湯,完全不浪費!


材料

  • 鮮荷葉一整片,洗淨備用
  • 嘉美雞半隻,洗淨、抹乾、斬件
  • 蟲草花,20克,按包裝指示預先浸發,瀝水備用
  • 櫻桃木耳,一把,預先浸發,氽水 3 分鐘,過冷河瀝水備用
  • 紅棗,幾粒,開邊去核
  • 薑片,適量
  • 葱段,適量

雞肉醃料 (請按自己口味自行調節)

  • 鹽麴 25 克
  • 味醂 1茶匙

調味  (請按自己口味自行調節)

  • 蠔油 1 湯匙
  • 醬油 1.5 茶匙
  • 老抽 1 茶匙
  • 原糖 1.5 茶匙
  • 粟粉 1 花匙
  • 麻油 1.5 茶匙

做法

  1. 在大碗中放入雞件,加入醃料拌勻。最好放15-20 分鐘入味。
  2. 加入蟲草花、櫻桃木耳、紅棗、薑片、葱段和調味料拌勻。
  3. 燒熱水,放入荷葉略燙至軟,印乾備用。如荷葉太大可沿邊剪去一圈留煮湯用。
  4. 把荷葉放在大碟上,倒入雞件和配料,舖成一層,用荷葉包好,插上牙籤封口。
  5. 在鑊中以中火蒸 40 分鐘*,又或以水波爐純蒸50-60分鐘**至全熟即成。
          *減細火力加長烹調時間,目的是讓荷香與其他食材的味道充份融合,雞肉亦更嫩滑。
          **水波爐蒸氣較弱,雞肉被荷葉包裹,更難受熱,蒸的時間會因為雞件的大小、食材是否剛從冰箱取出、蒸碟的材質厚薄和傳熱快慢等等而須要加長。必須檢查雞肉熟透才出菜。

Pork Tenderloin stuffed with Chorizo and Mushrooms 西班牙風乾腸蘑菇釀豬柳


材料 (足夠2-3人作主菜)

  • 急凍豬柳,250克 (預先解凍)
  • Chorizo (西班牙風乾腸),50克,去衣切碎
  • 洋葱(大),半個,切碎
  • 蘑菇,125克,切片
  • 蒜茸,1/2茶匙
  • Fennel seeds (小茴香籽),一少撮(未有在照片中)
  • Paprika, 1/4 茶匙
  • Crushed dried chili (乾辣椒碎),適量
  • Fresh thyme (新鮮百里香),適量
  • Italian parsley (新鮮蕃茜),適量
  • 鮮磨黑胡椒,適量


醃料

  • 鹽麴,15-20克


做法

  1. 用刀在豬柳沿邊淺淺切入,一邊切一邊卷開,片成一整片約 1厘米厚,加入醃料抹勻包好,放入雪櫃醃一小時以上。可早一晚預備。
  2. 燒熱平底鑊,加少量油,加入洋葱粒以中小火炒至香軟。
  3. 加入蘑菇片炒至略乾身,加入 chorizo 和 fennel seeds,慢慢炒至風乾腸滲油,加入蒜茸、paprika、crushed dried chili 和香百里香的葉片炒勻。最後加入黑胡椒和 Italian parsley。把所炒好的饀料放在碗中備用,稍稍放涼至不燙手。
  4. 把豬柳攤開,把饀料薄薄舖在豬肉上留約一吋封口位置。把豬肉卷好,太鬆會包不穩饀料,太緊又會把饀料都擠出來。用棉繩先把肉卷頭尾紥好,再在中間加繩固定。
  5. 把焗爐預熱至攝氏 180度。
  6. 燒熱平底鑊,加一點點油,把肉卷表面都煎至金黃。
  7. 把已用水軟的新薯放入焗盤,拌入欖橄油、黑胡椒和海鹽,放上肉卷。
  8. 把焗盤放入焗爐烤25分鐘。
  9. 取出焗盤,用錫紙封好放15-20分鐘。
  10. 取出肉卷切厚片上碟。